

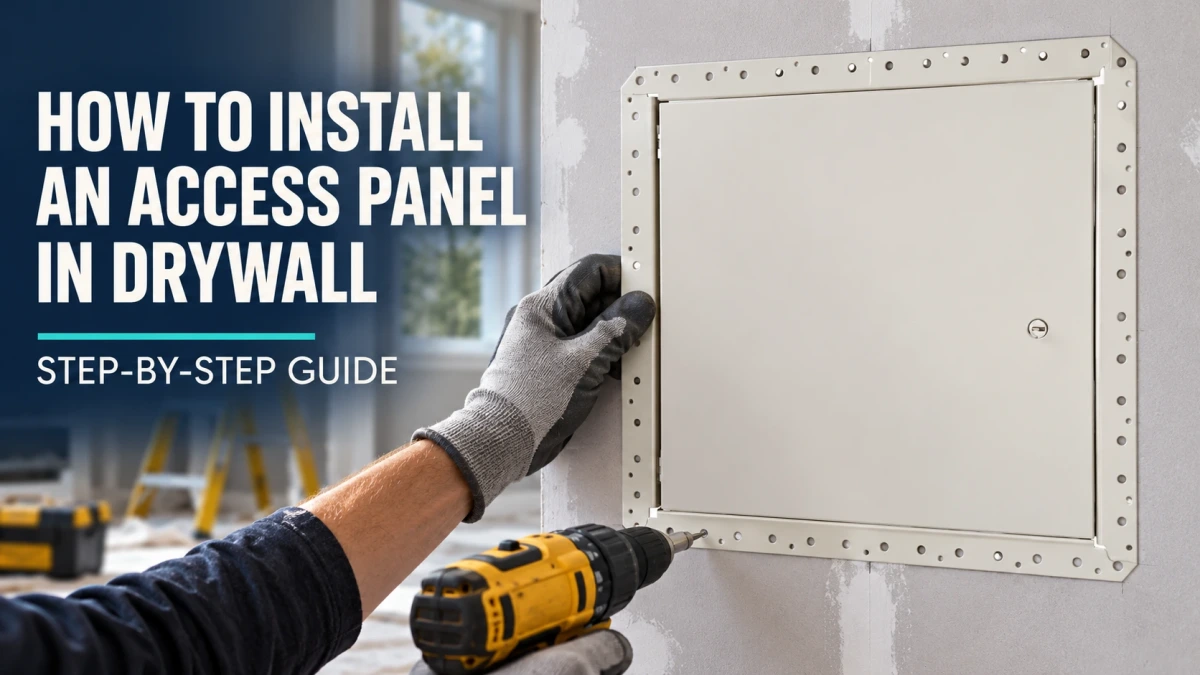
How to install an access panel in drywall: opening sizes by model, framing and blocking, fixing the frame, press-fit panels and finishing the bead cleanly.
Most access panels that look wrong in a finished wall were not badly made. They were fitted into the wrong size hole, screwed into nothing, or taped over in a way that stops the door from opening. All three are decided before the frame goes in.
This guide covers how to install an access panel in drywall, step by step, for the two installation methods used on standard wall and ceiling panels: a beaded flush door screwed to framing, and a press-fit panel that grips the drywall itself. The opening rules are different for each, and getting that one number right is most of the job.
Choose the panel before you cut anything
The panel decides the hole, so pick it first. For a visible, finished panel in a drywall wall or ceiling, Karp builds three models, and each one installs differently.
| Model | How it fixes | Opening rule | Standard sizes | Best for |
|---|---|---|---|---|
| KDW flush door for drywall | Drywall screws through the flange into framing | Door size + 3/8 in | 10 sizes, 6 x 6 to 36 x 24 | A panel taped in to finish with the wall |
| DSC-214M flush door | Fixed to framing, with masonry straps for masonry | Door size + 3/8 in | 24 sizes, 6 x 6 to 48 x 24 | Larger openings and mixed surfaces |
| PF press-fit panel | Tabs on the return bend back to grip the drywall | Door size - 3/16 in | 5 sizes, 8 x 8 to 24 x 24 | Fast fitting where there is no framing to screw to |
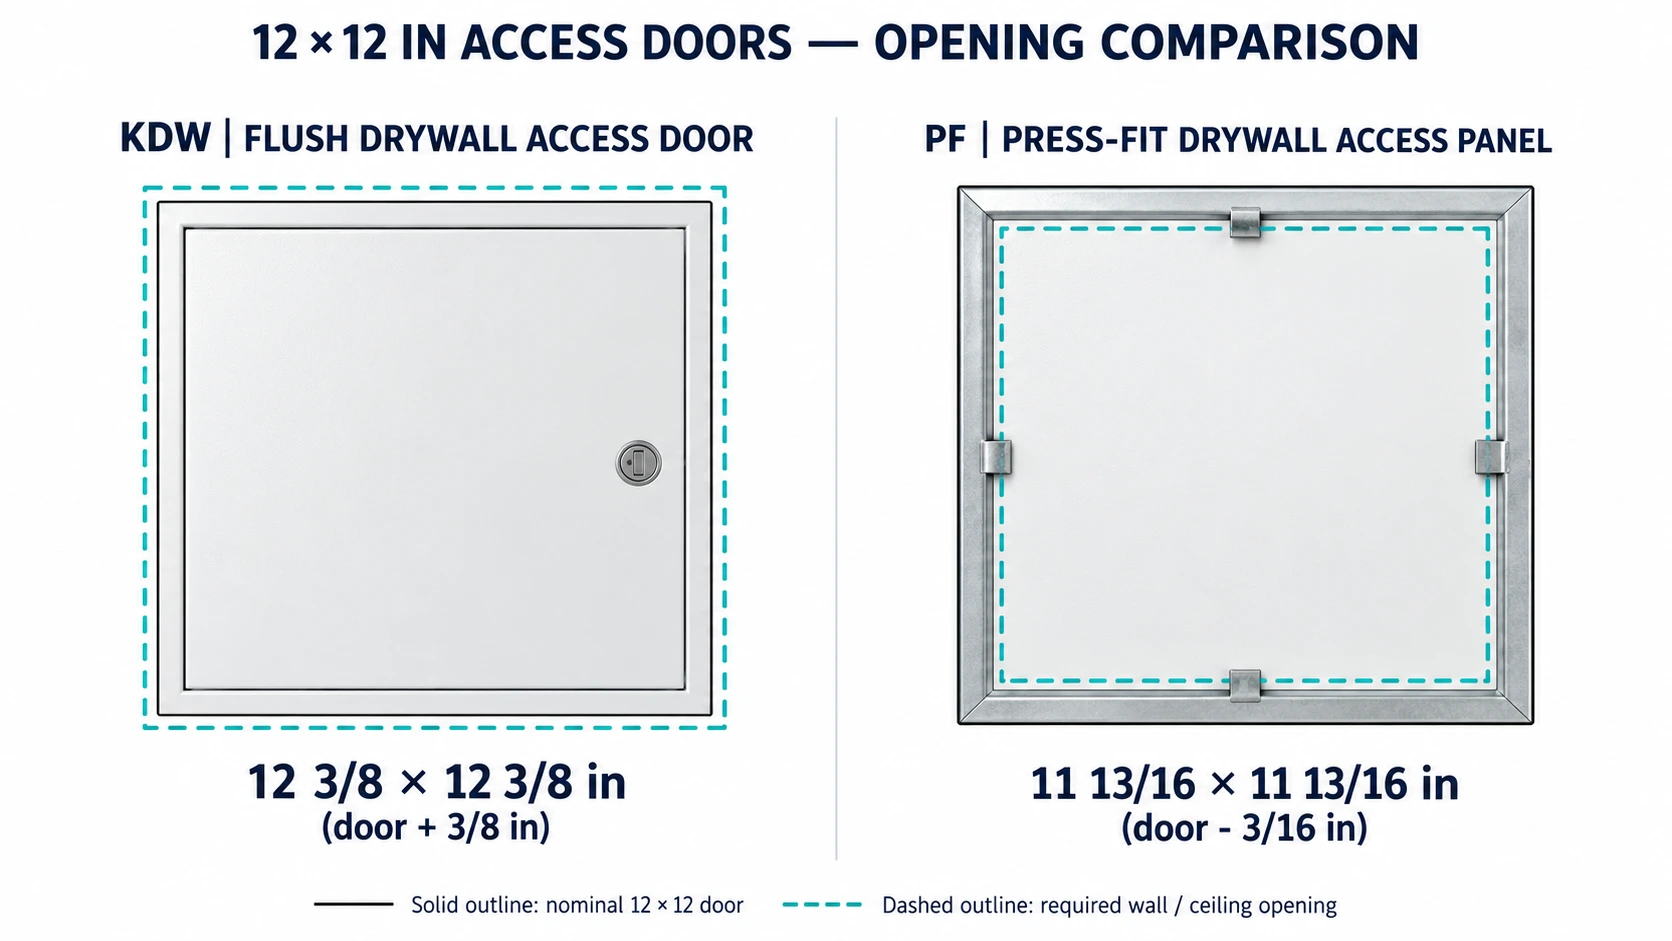
Look at the third column. The beaded doors need a hole 3/8 inch bigger than the door. The press-fit panel needs a hole 3/16 inch smaller than the door, because its tabs have to bear on the drywall edge to hold. Cut a press-fit opening to the beaded rule and the panel will fall straight through. Cut a beaded opening to the press-fit rule and the frame will not go in.
If the panel has to disappear into the wall rather than sit flush in it, this is a different install. See our guide to concealed access panels. If the wall is fire rated, stop here and read the fire rated section below first.
Other products install differently again. A duct door is cut into sheet metal with a smaller opening than the door, covered in our guide to duct access doors. Floor doors are cast into concrete and roof hatches are set on a curb, covered in the floor hatch guide and the roof access hatch guide. This guide stays with drywall.
Tools and materials
- The access panel, and its size table from the product page
- Stud finder, tape measure, level and pencil
- Drywall saw or oscillating tool, and a utility knife
- Drill driver and drywall screws
- Lumber or metal track for blocking, if the opening falls between framing
- Joint compound, tape, a 6 inch knife and sanding block
- Primer and paint to match the wall
- Safety glasses and a dust mask
Step 1: Check what is behind the wall
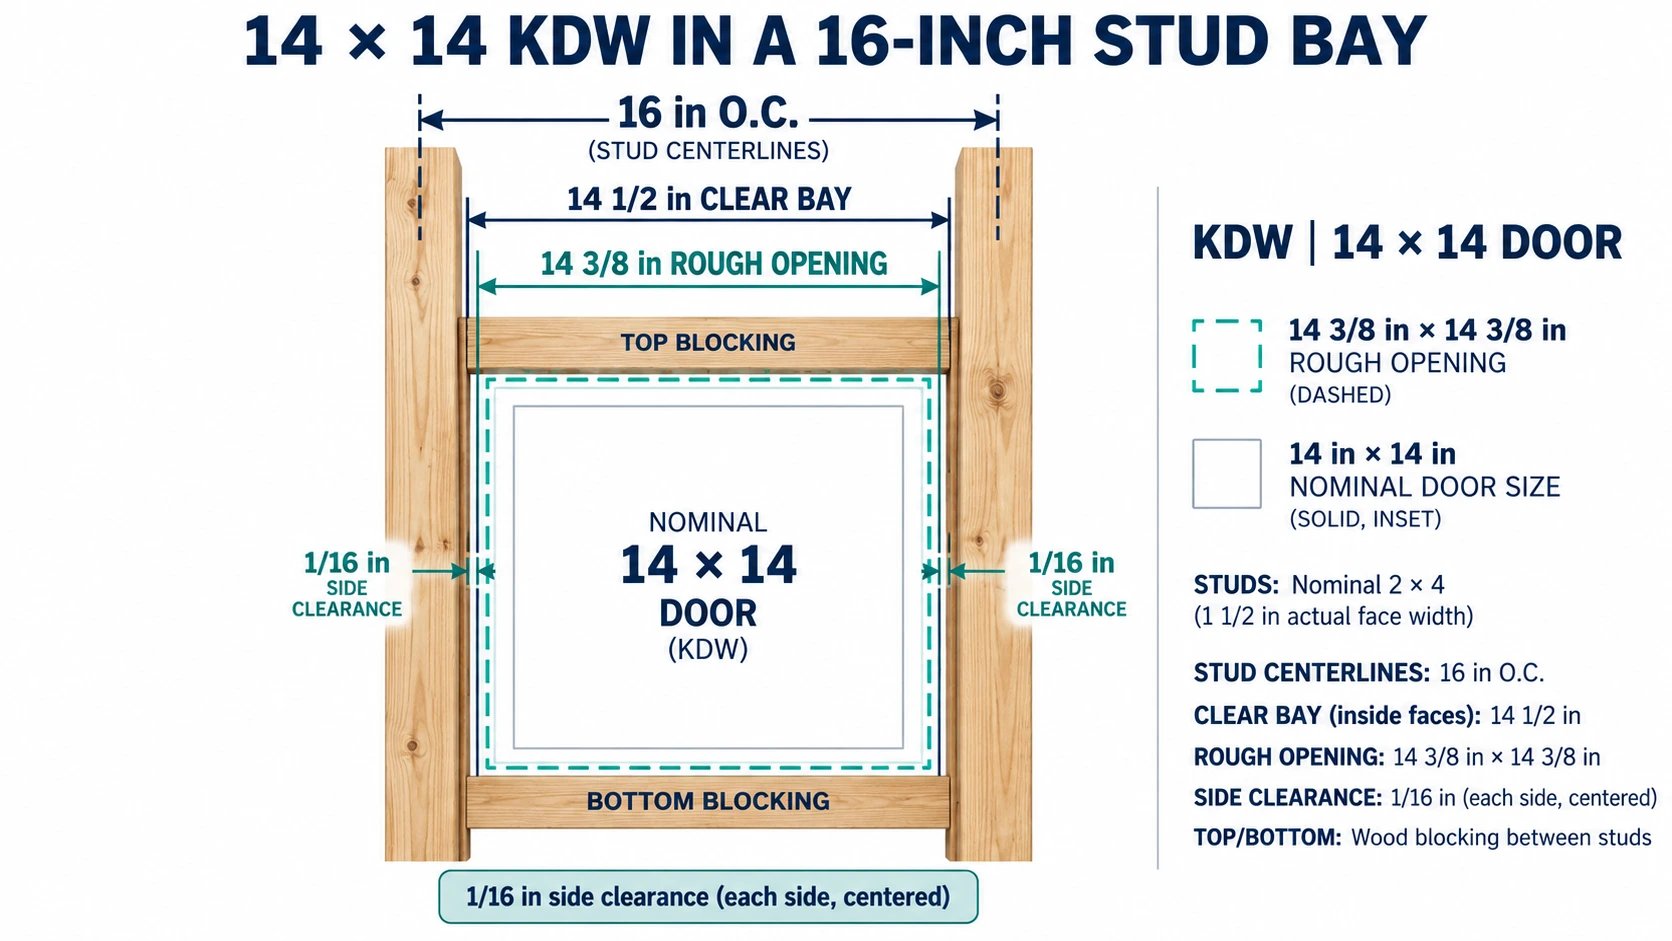
Find the framing first. A stud finder will show the studs or ceiling joists, and the panel position should be set against them rather than wherever the valve happens to be. On a wall framed at 16 inches on center, the clear bay between studs is roughly 14 1/2 inches. At 24 inches on center it is roughly 22 1/2 inches.
That number decides how much work the install is. A KDW 14 x 14 needs a 14 3/8 x 14 3/8 opening, which fits inside a 14 1/2 inch bay with the studs on both sides to screw into. A 16 x 16 needs 16 3/8 inches, which means cutting a stud and heading the opening. If the location is flexible, size the panel to the bay. The access panel sizes guide covers how to choose a size from what has to pass through the opening.
Then check for services. Wiring, supply lines and drain runs all live in stud bays, and a saw blade does not know the difference. Look for outlets and switches on either side of the wall, check the floor above and below for fixtures, and turn off the circuit if there is any doubt. The California Department of Public Health's electrical safety checklist puts it plainly: check for electrical wiring before drilling, cutting or sawing into walls, ceilings or floors.
Step 2: Mark the opening from the size table
Take the wall opening dimension off the product size table, not the door size. Every Karp size table lists both, side by side.
- KDW and DSC-214M: the opening is 3/8 inch larger than the door in each direction. A 12 x 12 door needs a 12 3/8 x 12 3/8 opening. A 24 x 24 needs 24 3/8 x 24 3/8.
- PF press-fit: the opening is 3/16 inch smaller than the door. A 12 x 12 panel needs an 11 13/16 x 11 13/16 opening. A 24 x 24 needs 23 13/16 x 23 13/16.
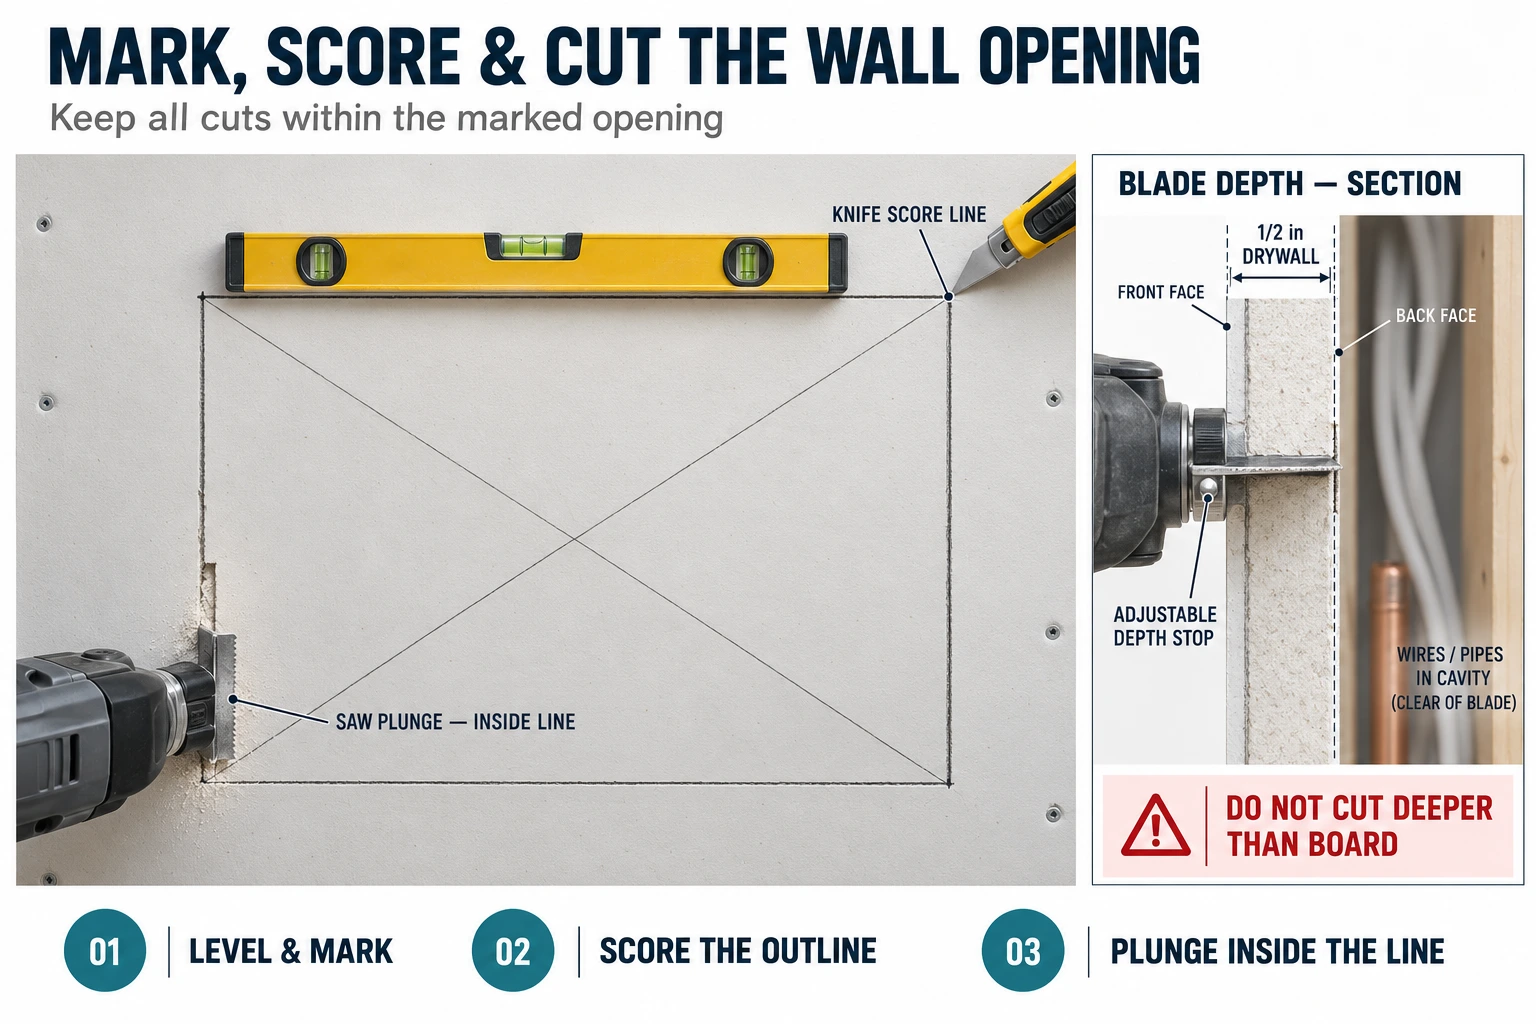
Draw the rectangle with a level, square to the floor or ceiling line rather than to the nearest tile or trim. Measure both diagonals. If they match, the rectangle is square. A frame set into an opening that is out of square will rack, and a racked frame is how a door ends up binding or not latching.
Step 3: Cut the opening
Score the lines with a utility knife first. It gives clean edges and stops the face paper tearing past the line, which matters most on a press-fit panel where the drywall edge is what holds the panel.
Start the cut with a drywall saw plunged inside the line, or with an oscillating tool. Keep the blade shallow, no deeper than the board, so it does not reach anything in the cavity. Cut just inside the line and trim back to it. An opening can always be made bigger. It cannot be made smaller without patching.
Test fit the frame before going further. A beaded frame should drop in with an even gap all round. A press-fit panel should need a firm push.
Step 4: Frame the opening
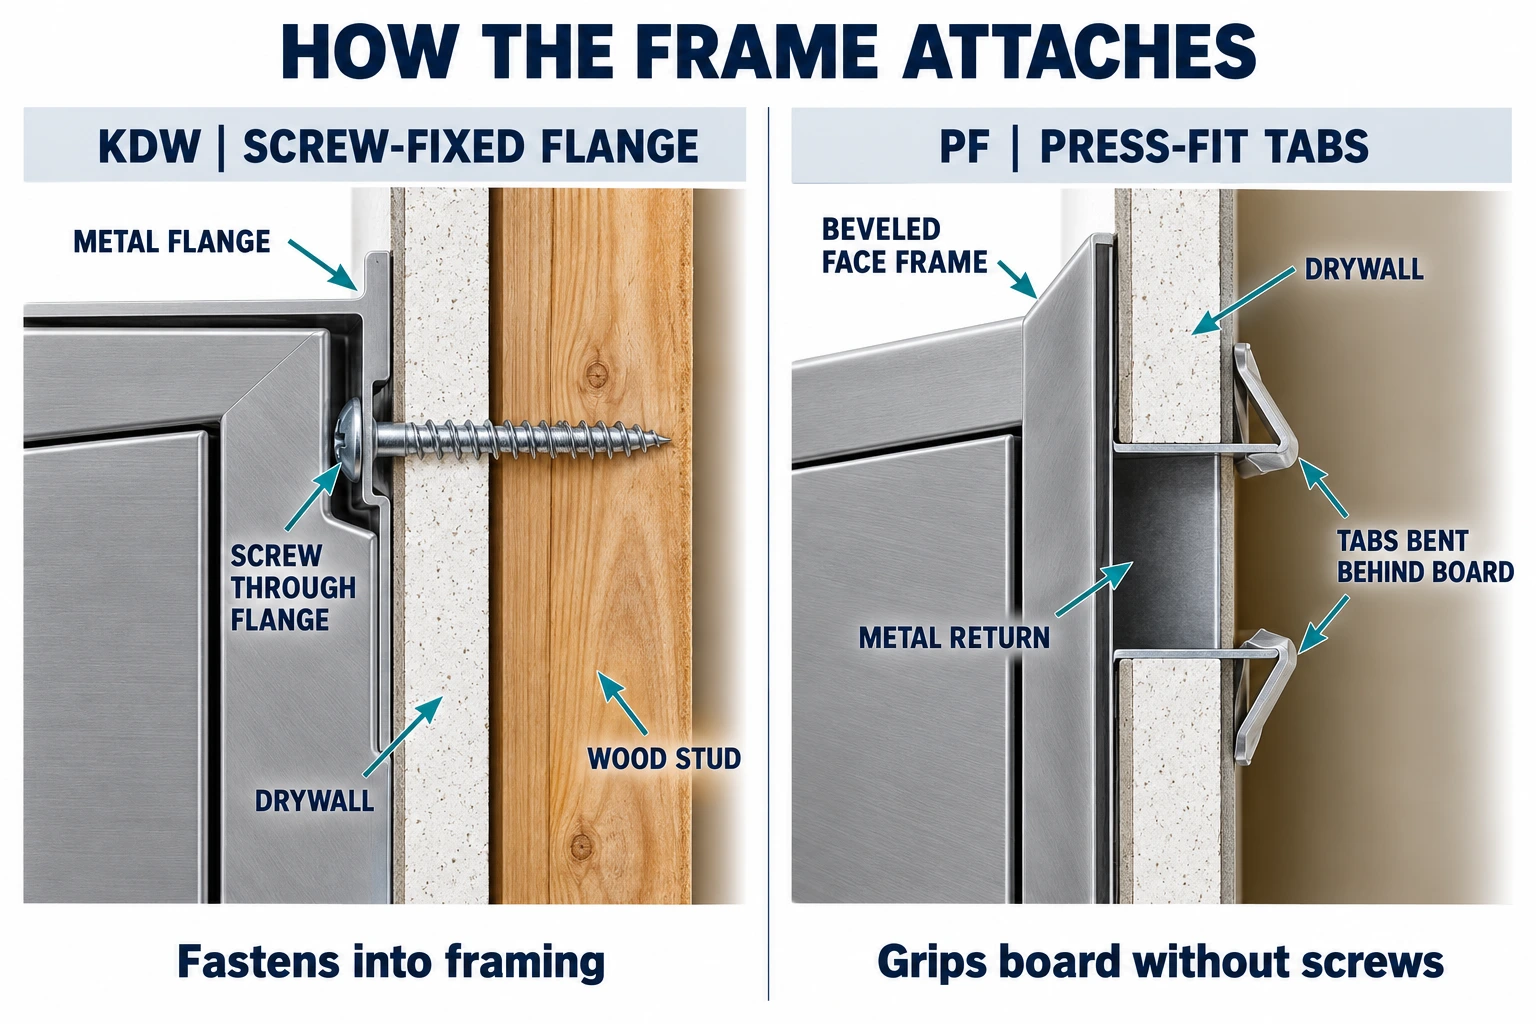
A beaded flush door is fixed with drywall screws through the prepunched holes in its flange into framing members. Drywall alone will not hold those screws under the load of a door opening and closing for years. So every side of the frame needs something solid behind it.
- Opening between two studs: the studs take the hinge and latch sides. Add a horizontal block across the bay at the top and bottom of the opening.
- Opening wider than the bay: cut the stud, add a header above and a sill below, and add vertical blocking to bring framing to each side of the opening.
- Ceiling: block between joists on all four sides so the frame has a solid fixing on every edge.
Fix the blocking flush with the back of the drywall so the flange sits flat. A frame screwed down over an uneven face will twist. In masonry, the KDW takes masonry straps instead.
The press-fit panel does not need framing for fixing, because it is held by the drywall. It still needs a clear cavity behind it deep enough for the return and the door, so make sure there is no blocking, pipe or cable sitting where the panel will go.
Step 5: Fit the panel
Beaded flush door (KDW)
- Open the door and set the frame in the opening, hinge side where you want the door to swing from.
- Check it is level and the gap is even on all sides.
- Drive drywall screws through the prepunched flange holes into the framing. Start with one screw at each corner and do not fully tighten them.
- Close the door and check it swings freely and latches. If it binds, the frame is racked. Back the screws off, shim behind the flange where needed, and recheck.
- Drive the remaining screws and tighten everything down. Stop when the screw head is flush. Overdriving pulls the flange into the board and distorts the frame.
- Open and close the door several times and operate the latch or lock before going near it with compound.
The DSC-214M follows the same sequence: frame, check, fix, check again. Its fixing detail varies with the surface it is going into, so read its spec sheet before setting it.
Karp's own installation instructions for its fire rated doors follow the same sequence: mark the fixings through the frame holes, fix the frame, then check the panel moves freely and shim out any racking. It is worth reading even for a non-rated install.
Press-fit panel (PF)
- Check the opening against the size table: door size minus 3/16 inch.
- Bend the tabs on the return back so they will bear on the back of the drywall.
- Push the panel into the opening until the beveled frame sits tight to the wall face.
- Check the door opens and latches.
No tools and no screws. The frame, return and doorstop are one piece, so there is nothing to assemble. The trade-off is the size range, which tops out at 24 x 24, and the fact that the panel is only as strong as the board around it. Confirm the drywall thickness the panel is designed for on the spec sheet before ordering.
Step 6: Tape and finish the bead
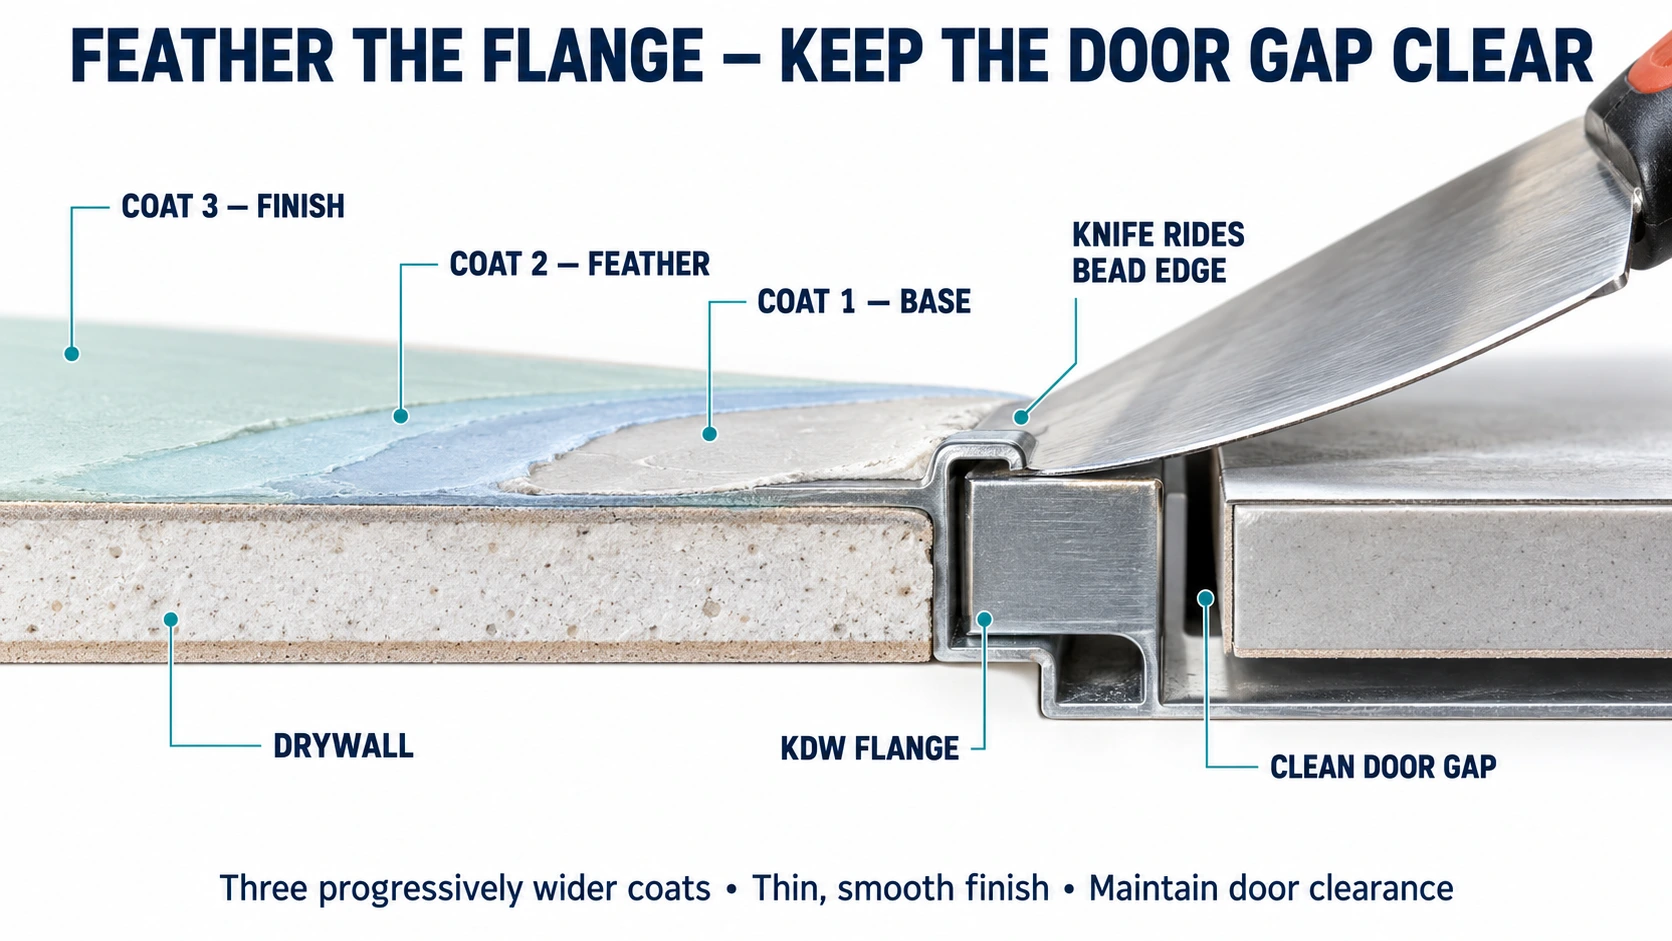
The KDW has a textured frame and bead so joint compound can be applied thick enough to hide the flange. Finished properly, all that shows is the door face and a fine line around it.
- Close the door. Run tape over the joint between the bead and the wall where needed.
- Apply the first coat of compound over the flange, feathering out onto the wall. Keep the knife riding on the bead edge so compound does not bridge onto the door.
- Let it dry, then apply a second and third coat, each wider than the last.
- Sand lightly. Do not sand the door face.
- Open the door before the compound fully cures and clean any compound out of the gap and off the hinge.
- Prime and paint the wall and the door face together so they match.
The finishing standard the trade works to is the Gypsum Association's GA-216 application and finishing standard. If the wall is under raking light or getting a gloss paint, finish to the level the rest of the wall is getting, or the panel outline will show.
Installing an access panel in a drywall ceiling
The steps are the same, with three differences.
Weight is overhead. Check the shipping weight on the size table. A KDW 24 x 24 ships at 17.2 pounds and a 36 x 24 at 25.9 pounds. That is a two-person lift at ceiling height.
Specify safety chains. They are available on the KDW and the DSC-214M, and they stop the door dropping free when it is opened. In a ceiling they are not optional.
Block every side. Joists run one way, so the opening will only have framing on two sides unless blocking is added on the other two.
Ceiling type changes the panel choice more than the install. Grid ceilings and large drywall openings use different models, covered in our guide to drywall ceiling access panels.
Fire rated walls: follow the listing, not this guide
A fire rated access door keeps its rating only in the assembly it was tested in, installed the way its instructions say. The steps above are for non-rated walls and ceilings.
Rated installs differ in ways that matter. Karp's instructions for the KRP-150FR and KRP-350FR for drywall call for the opening to be lined with 5/8 inch Type X gypsum board, fixed with screws at set spacings, with the door fixed with #10 drywall screws. Every Karp fire rated door is self-closing, and larger doors carry an extra closing spring the installer connects to the framing. Rated shaft walls have their own shaft wall installation instructions.
Use a door listed for the rating and the location, then install it exactly as instructed. Our guide to fire rated access doors covers what a listing covers and what voids it, and the full range is under fire rated access doors.
Common installation mistakes
- Cutting to the door size. The opening is a different number. Read it off the table.
- Using the wrong opening rule. Beaded doors need a bigger hole than the door. Press-fit panels need a smaller one.
- Screwing into drywall only. The flange screws need framing behind them, or the frame works loose.
- Not checking the swing before taping. Once the bead is finished, a racked frame means cutting it back out.
- Overdriving screws. It bends the flange and twists the frame.
- Compound in the door gap. It sets hard and glues the door shut.
- A heavy ceiling panel without safety chains. The door can drop free the first time someone opens it.
- Swapping a non-rated panel into a rated wall. It voids the assembly.
Drywall access panel installation checklist
- Panel chosen and size table in hand.
- Framing located and the cavity checked for wiring and pipes, circuit off if in doubt.
- Opening marked from the wall opening dimension, square and level.
- Opening cut inside the line and test fitted.
- Blocking on every side for a beaded door. Clear cavity for a press-fit panel.
- Frame fixed, door swing and latch checked, racking shimmed out.
- Bead finished in three coats, door gap kept clear, painted with the wall.
- Safety chains on ceiling panels.
- Rated assembly? Listed door, installed to its own instructions.
For more installation guidance by model, see installation training and the support section, and for written specifications see the architectural specifications library. Standard sizes in the full non-rated range are under standard access doors. To order, request a quote with the model and opening size, or contact the sales team for anything outside the standard tables.
Frequently Asked Questions
How do you install an access panel in drywall?
What size hole do I cut for a drywall access panel?
Do I need to frame an access panel opening in drywall?
Can you install an access panel without studs?
How do you finish a drywall access panel so it blends in?
Can I install an access panel in an existing wall?
How do you install an access panel in a drywall ceiling?
Can I cut an access panel into a fire rated wall?

Karp Team
Karp Associates has manufactured access doors, floor doors and roof hatches in the United States since the 1960s, across fourteen product families. All products are made at the company's facility in Melville, New York.
Need the Right Access Solution?
Explore Karp's USA-manufactured access doors, fire-rated panels, and custom solutions built for commercial projects.